

CHOOSING A MODEL, SETTING IT UP, SYSTEMS, STRUCTURE, CONFIDENCE, WORKFLOW
PLATFORMS & BUSINESS TOOLS FOR BUILDING THE BUSINESS👉 Systeme.io
Welcome to your Complete Systeme.io Setup Guide! 🚀
This Systeme.io Setup Guide walks you through every essential step, even if you’re starting from scratch or simply fine-tuning your account. From creating your free account and customizing your profile to setting up your domain and connecting payment gateways, you’ll find everything you need in one place.
- 👉 Systeme.io
- Welcome to your Complete Systeme.io Setup Guide! 🚀
- SIGN UP FOR YOUR FREE SYSTEME.IO ACCOUNT
- Step 1: Go to the Systeme.io Signup Page
- Step 2: Enter Your Details
- Step 3: Agree to the Terms
- Step 4: Click “Create My Account”
- Step 5: Verify Your Email Address
- Step 6: Log In to Your New Account
- EDIT YOUR SYSTEME.IO ACCOUNT PROFILE✍️
- HOW TO ADD A FAVICON TO SYSTEME.IO 🔖
- 1: Prepare Your Favicon Image
- SET UP YOUR CUSTOM DOMAIN 🛠️
- Step 1: Understand What a Custom Domain Is
- SET UP YOUR CUSTOM DOMAIN TO SYSTEME.IO 🌐
- Step 1: Purchase a Domain
- Step 3: Access Domain Settings
- Step 4: Add Your Custom Domain
- Step 8: Set Your Custom Domain as Default (Optional)
- Add a Domain Business Email 📧
- Step 1: Choose Your Email Hosting Provider
- Step 2: Set Up Your Business Email Account
- Step 3: Configure DNS Records for Email
- Step 4: Verify Your Email Setup
- Step 5: Connect Your Business Email to Systeme.io (Optional)
- CONNECT PAYPAL & STRIPE 💳
- Step 1: Log In to Your Systeme.io Account
- Step 2: Access Payment Gateway Settings
- Step 3: Connect Your PayPal Account
- Step 4: Connect Your Stripe Account
- Step 5: Verify Payment Gateways
- Systeme.io Guide Navigation
Throughout this page, each section highlights a key part of your setup journey with quick tips and clear, actionable instructions. If you’d like to explore further, you can also access detailed tutorials that break down every step even more thoroughly.
To make things easy, use the table of contents or tabs below to jump straight to the tutorial you need. This way, you can get your Systeme.io account up and running smoothly — without the overwhelm.
Even if you’re not tech-savvy, don’t worry — every tutorial is written in plain English with step-by-step guidance.
SIGN UP FOR YOUR FREE SYSTEME.IO ACCOUNT
Starting your online business journey with Systeme.io is easy and free! Follow these simple steps to create your account and get ready to build your funnels, courses, and email marketing campaigns.
Step 1: Go to the Systeme.io Signup Page
Open your web browser and visit the official signup page here: 👉 https://systeme.io/signup
This is where you’ll start the process of creating your free account.
Step 2: Enter Your Details
On the signup page, fill in the required information:
- Full Name: Enter your first name and last name.
- Email Address: Use an email you check regularly—this will be your login and where important notifications will go.
- Password: Create a strong password (at least 8 characters, mix of letters, numbers, and symbols).
- Confirm Password: Re-enter your password to confirm.
Step 3: Agree to the Terms
Read through the terms of service and privacy policy (links usually available near the signup form). Tick the box to agree. This is important for compliance and to protect your account.
Step 4: Click “Create My Account”
Once all fields are filled and you’ve agreed to the terms, click the Create My Account button.
Step 5: Verify Your Email Address
- Check your inbox for a confirmation email from Systeme.io.
- If you don’t see it within a few minutes, check your spam or promotions folder.
- Open the email and click the verification link to activate your account.
Step 6: Log In to Your New Account
After verification, return to the Systeme.io login page:
👉 https://systeme.io/login
Enter your email and password, then click Log In.
You’ll be taken to your Systeme.io dashboard — your command center for building funnels, creating courses, managing email marketing, and more!
Quick Tips:
- Bookmark the login page for easy access.
- Consider setting up two-factor authentication for extra security (found in your account settings).
- Explore the dashboard tutorials to get familiar with key features.
You’re now ready to start building your online business with Systeme.io! 🎉
EDIT YOUR SYSTEME.IO ACCOUNT PROFILE✍️
Edit Your Account Profile
Personalizing your Systeme.io account helps keep your workspace organized and your information up to date. In this tutorial, you’ll learn how to edit your profile details quickly and easily.
Step 1: Log In to Your Systeme.io Account
Head to the login page:
👉 https://systeme.io/login
Enter your email and password, then click Log In to access your dashboard.
Step 2: Access Your Profile Settings
- Once logged in, look for your profile icon or your name in the top right corner of the dashboard.
- Click it to open a dropdown menu.
- Select Account Settings or Profile Settings from the list.
Step 3: Edit Your Personal Information
In your profile settings, you can update important details such as:
- Full Name: Make sure your name is correct and appears the way you want it on your invoices and communications.
- Email Address: Change your primary contact email if needed (note: some platforms may require re-verification).
- Password: Update your password here to keep your account secure.
- Notification Preferences: Choose how and when you want to receive emails from Systeme.io (newsletters, alerts, etc.).
- Time Zone: Set your correct time zone to ensure scheduling and reports are accurate.
Step 4: Save Your Changes
After making the necessary updates, scroll down and click the Save Changes button to apply your new settings.
Step 5: Verify Updates (If Needed)
- If you change your email address, Systeme.io may send a confirmation link to your new email.
- Check your inbox and click the verification link to confirm the update.
Quick Tips:
- Regularly update your password for security.
- Keep your contact email current to avoid missing important account notifications.
- Explore other settings in your account dashboard for personalization options.
Updating your profile is a small step that helps keep your Systeme.io experience smooth and secure.
HOW TO ADD A FAVICON TO SYSTEME.IO 🔖
A favicon is the small icon that appears in your browser tab next to your website’s title. Adding a custom favicon to your Systeme.io site makes your brand instantly recognizable and more professional.
1: Prepare Your Favicon Image
- Favicons are usually small square images, typically 16×16 or 32×32 pixels.
- The file should be in .ico, .png, or .svg format.
- If you don’t have one yet, you can create a simple favicon using free tools like favicon.io or Canva.
2: Log In and Access Your Site Settings
- Go to https://systeme.io/login and log in.
- From the dashboard, navigate to Settings or Website Settings (the exact menu name can vary depending on your setup).
3: Find the Favicon Upload Option
- Within settings, look for a section labeled Favicon, Branding, or Site Identity.
- Click the option to upload or change your favicon.
4: Upload Your Favicon File
- Click Upload, then select your prepared favicon image file from your computer.
- Once uploaded, the new favicon will be set for your site.
5: Save and Verify
- Click Save Changes or Update Settings to confirm.
- Visit your website and refresh the page to see your new favicon appear in the browser tab.
Quick Tips:
- It may take a little time for the favicon to update due to browser caching — try clearing your cache or viewing your site in an incognito/private window.
- Use a simple, clear icon for best visibility at small sizes.
- If your Systeme.io plan limits branding options, check if favicon upload is included or requires an upgrade.
Adding your favicon is a quick way to give your site a polished, professional look that builds trust with visitors.
SET UP YOUR CUSTOM DOMAIN 🛠️
A custom domain gives your website a professional look and makes it easier for visitors to find and remember you. This tutorial guides you through getting your own domain name for your Systeme.io site.
Step 1: Understand What a Custom Domain Is
A custom domain is the unique web address (like yourbusiness.com) that visitors type to reach your site. Instead of using a generic Systeme.io URL, having your own domain builds trust and strengthens your brand.
Step 2: Decide Whether to Buy a New Domain or Use an Existing One
- Buy a new domain: You can purchase a domain through registrars like Namecheap, GoDaddy, or Google Domains.
- Use an existing domain: If you already own a domain, you can connect it to Systeme.io (we’ll cover this in the next tutorial).
Step 3: Choosing a Domain Name
When picking a domain:
- Keep it short, memorable, and easy to spell.
- Avoid numbers, hyphens, or complicated words.
- Use keywords related to your business or niche if possible.
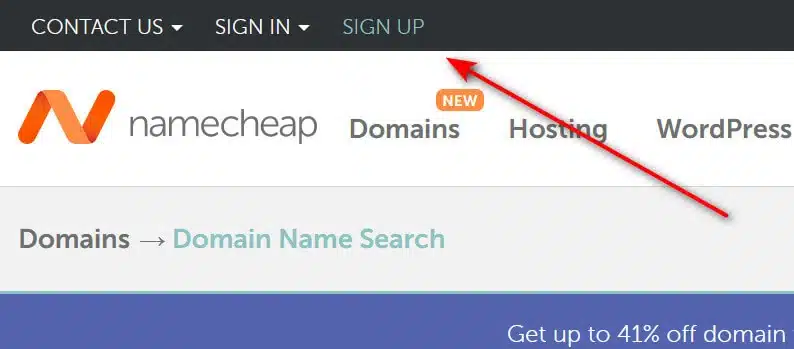
Step 4: Purchase Your Domain
- Visit your preferred domain registrar’s website.
- Search for your desired domain name to check availability.
- Follow the prompts to purchase and register your domain.
- Make sure to provide accurate contact information during registration.
Step 5: Secure Your Domain
- Consider purchasing domain privacy protection to hide your personal information.
- Set your domain to auto-renew to avoid losing it accidentally.
Quick Tips:
- Keep your domain registration details safe—you’ll need them to connect the domain later.
- Domains typically cost between $10 and $20 per year depending on the extension (.com, .net, .org, etc.).
- If you want, I can help you with the next tutorial on how to connect your custom domain to Systeme.io.
Owning your own domain is a key step toward building a professional online presence and making your website easy to find!
SET UP YOUR CUSTOM DOMAIN TO SYSTEME.IO 🌐
Setting up a custom domain in Systeme.io involves several steps to ensure that your domain properly points to your Systeme.io pages, giving your brand a more professional appearance and making it easier for users to find and remember your website. Here’s a step-by-step guide to help you configure your custom domain in Systeme.io:
Step 1: Purchase a Domain
If you haven’t already purchased a domain, you need to do so from a domain registrar. The preferred one is Namecheap.
Step 2: Log in to Your Systeme.io Account
– **Navigate** to the Systeme.io website and log in with your credentials.
– Once logged in, access your dashboard.
Step 3: Access Domain Settings
– In your Systeme.io dashboard, go to the left sidebar and click on “Settings.”
– Within the settings menu, find and click on “Custom Domains.”

Step 4: Add Your Custom Domain
– In the Custom Domains section, click on the “Add Domain” button.
– Enter your domain name in the provided field (for example, `www.yourdomain.com`). It must include the www.
– Click on the “Save” or “Add Domain” button to proceed.
Step 5: Configure DNS Settings at Your Domain Registrar
– Log in to your account where your domain is registered.
– Navigate to the DNS management page. This might be called something like DNS Configuration, Name Server Management, or similar.
– You will need to create or edit CNAME records. Specifically, you need to point your domain to Systeme.io’s servers. Set the `CNAME` for `www` to point to `custom.systeme.io`.
**Example:**
– Type: CNAME
– Host: www
– Value/Points to: custom.systeme.io
– TTL: 1 hour or default
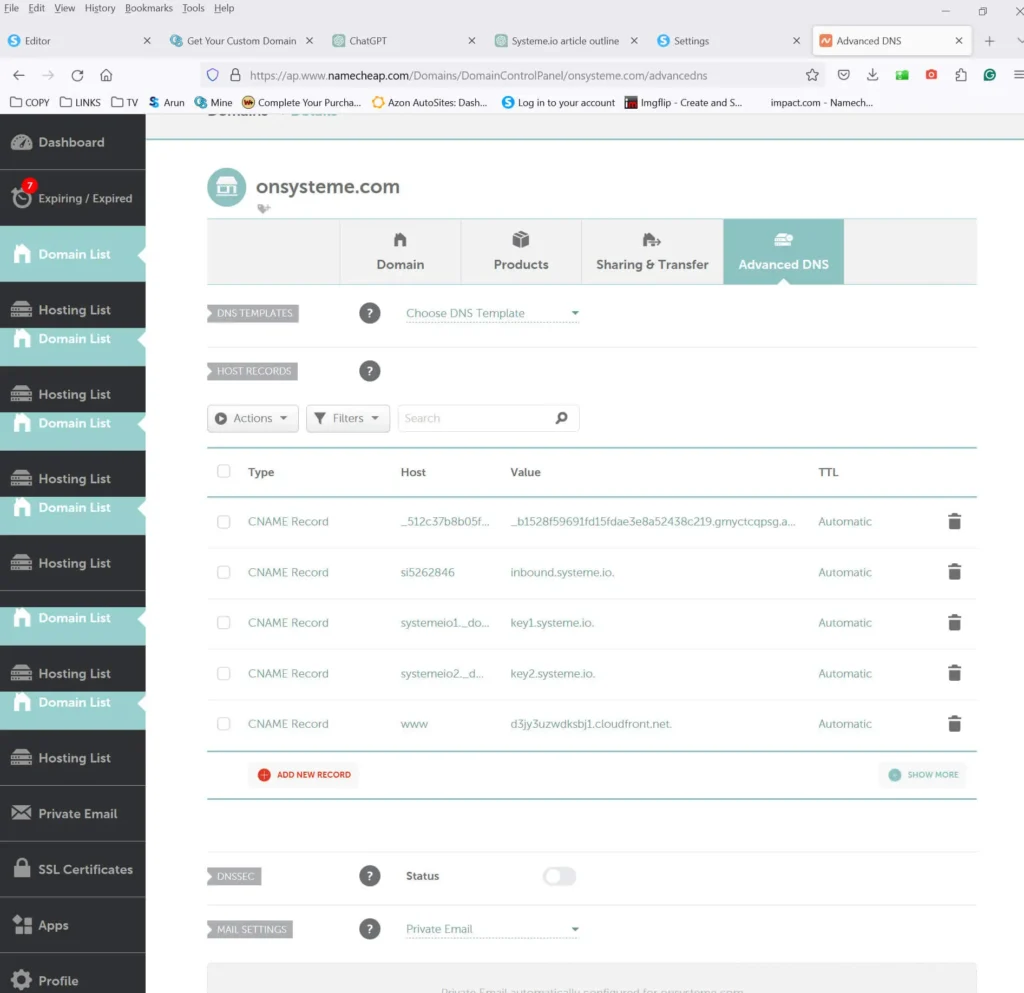
***Note:** If you want to use a root domain (like `yourdomain.com` without `www`), you will typically need to set up a redirect or use an A record if supported. Systeme.io generally recommends using the `www` version.
Go back and click on the domain tab
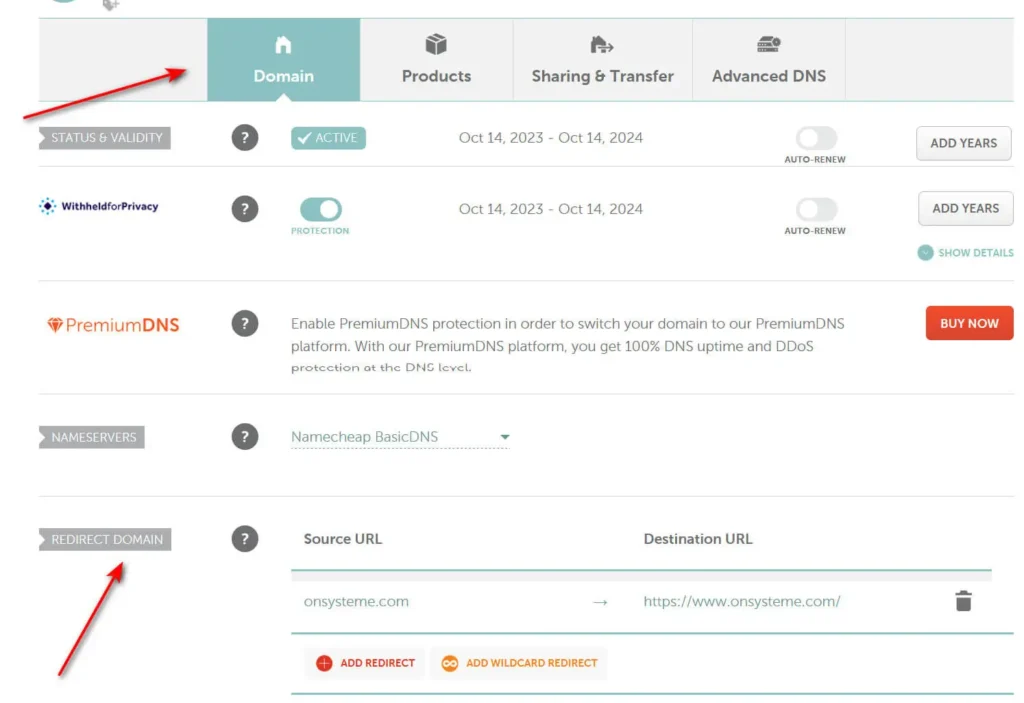
Where it says redirect domain, in the source area add your domain without the http://www.
– Then in the destination URL include the whole domain: eg http://www.domain.com
Step 6: Verify Domain Configuration
– After updating your DNS settings and redirect, return to your Systeme.io Custom Domains settings.
– Click on “Verify Domain” next to the domain you are configuring.
– It might take some time (up to 48 hours) for DNS changes to propagate. If the domain doesn’t verify immediately, wait some time and try again.
Step 7: SSL Configuration
– Systeme.io automatically manages SSL certificates for custom domains linked to its system.
– Once your domain is verified, Systeme.io will start the process of provisioning an SSL certificate for HTTPS access. This process can take up to 24 hours.
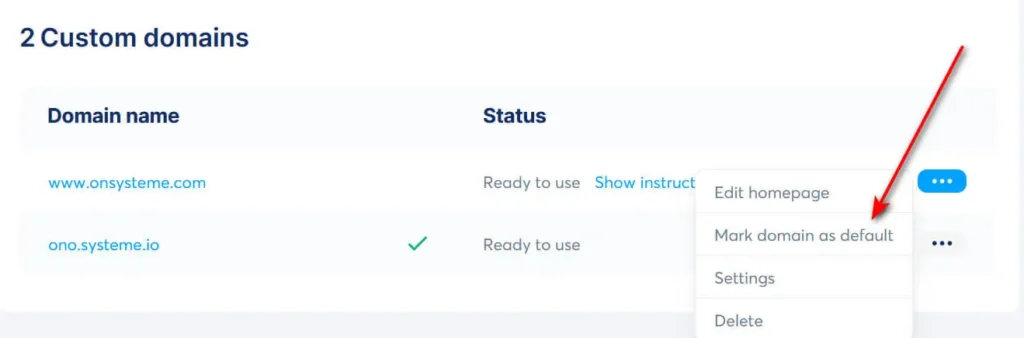
Step 8: Set Your Custom Domain as Default (Optional)
– Once your custom domain is verified and SSL is set up, you can make it the default domain for your Systeme.io account. This means all your Systeme.io-created pages will automatically use this domain.
Step 9: Testing
– Once everything is set up, test your domain by typing it into a web browser to ensure it loads your Systeme.io page correctly.
– Check to make sure that there are no security warnings and that SSL is working by looking for the padlock icon next to the URL in the browser.
By following these steps, you can successfully set up a custom domain in Systeme.io, enhancing your brand’s professionalism and trustworthiness. If you encounter any issues, Systeme.io’s support team is available to assist you or use my contact form if you prefer.
Quick Tips:
- DNS changes can take up to 48 hours, but usually happen faster.
- If you have trouble, contact your domain registrar’s support for help with DNS settings.
- Make sure to include “www” if that’s how you want your domain to appear.
Congratulations! Your Systeme.io site now uses your custom domain, boosting your brand’s professionalism and credibility. 🎉
Add a Domain Business Email 📧
Using a professional business email that matches your domain (like you@yourbusiness.com) builds trust and helps your brand stand out. This tutorial shows you how to set up and connect a domain-based business email.
Step 1: Choose Your Email Hosting Provider
Your domain registrar may offer email hosting, or you can use third-party services such as:
- Google Workspace (formerly G Suite)
- Microsoft 365
- Zoho Mail (free and paid plans)
- Your web hosting provider’s email service
Choose one based on your needs and budget.
Step 2: Set Up Your Business Email Account
- Sign up or log in to your chosen email hosting provider.
- Create a new email address using your domain (e.g., info@yourbusiness.com).
- Follow the provider’s setup instructions.
Step 3: Configure DNS Records for Email
To connect your email to your domain, you’ll need to add or update DNS records at your domain registrar:
- MX Records: These direct email traffic to your email hosting provider.
- TXT Records (SPF, DKIM): Help verify your emails and reduce spam.
Your email host will provide the exact DNS records and instructions to add them.
Step 4: Verify Your Email Setup
After updating DNS records, verify your email setup following your provider’s guidance. This can include domain verification and testing sending/receiving emails.
Step 5: Connect Your Business Email to Systeme.io (Optional)
- In Systeme.io, go to Settings > Email or Integrations.
- Add your business email as a sender address if you want to send emails from Systeme.io using your domain email.
- Follow any additional verification steps requested.
Quick Tips:
- DNS changes can take up to 48 hours to propagate fully.
- Keep your domain registrar login handy for managing DNS records.
- Using a domain-based email looks professional and improves email deliverability.
With your custom business email set up, you’re ready to communicate with customers confidently and professionally!
CONNECT PAYPAL & STRIPE 💳
To start accepting payments on your Systeme.io site, you’ll need to connect your PayPal and Stripe accounts. This tutorial walks you through linking both payment gateways so you can sell your products and services smoothly.
Step 1: Log In to Your Systeme.io Account
Go to:
👉 https://systeme.io/login
Enter your credentials to access your dashboard.
Step 2: Access Payment Gateway Settings
• From the dashboard menu, click on Settings.
• Select Payment Gateways or Integrations depending on your dashboard layout.
Step 3: Connect Your PayPal Account
• Find the PayPal section and click Connect or Link Account.
• You will be redirected to PayPal’s login page.
• Log in with your PayPal business account credentials.
• Authorize Systeme.io to access your account.
• Once authorized, you’ll return to Systeme.io with PayPal connected.
Step 4: Connect Your Stripe Account
• In the Stripe section, click Connect or Link Account.
• You will be redirected to Stripe’s login or signup page.
• Log in or create your Stripe account.
• Follow the prompts to authorize Systeme.io.
• After authorization, you’ll return to Systeme.io with Stripe linked.
Step 5: Verify Payment Gateways
• Confirm both PayPal and Stripe show as connected in Systeme.io.
• Run test transactions if possible to ensure payments are processing correctly.
Quick Tips:
• Use business accounts on PayPal and Stripe for better features and fewer restrictions.
• Make sure your account details match your business info to avoid payment holds.
• Keep your payment gateway credentials secure.
With PayPal and Stripe connected, you’re all set to start accepting payments and growing your online business effortlessly!
Systeme.io Guide Navigation
Main Guide: What is Systeme.io